User Tools
Table of Contents
ETC Dimmer Rack
All of the dimmer circuits throughout the school in the Market Square, Cafeteria and Drama room are connected to the central dimmer rack backstage. The dimmer rack is what allows you to very the brightness of each of the circuits by changing the voltage on the circuit. An electronic dimmer rack uses circuits and semiconductors to achieve this task (as opposed to a mechanical or relay based one). The dimmer rack receives 3 phase power (3x 120V) as far as I know, and is split across all of the lighting loads. We've never had an issue with it tripping, and it's rated for over 1 kW per channel (our most powerful lights are 1 kW), if it does, the power is controller from the big disconnect in the electrical room in the back of the office, which staff and student's aren't allowed in.
Controlling the Dimmer Rack
The dimmer rack in turn, is controlled by one of the lighting boards using DMX. There are 4 DMX ports (I'm aware of) in the school that are wired in parallel, allowing a lighting board to be connected. 1 in the Drama Room (by the speaker amp, across the drama office), 1 in Radio L'Am (under the microphone/speaker plugs), 1 in the Market Square (the panel by the cafeteria door) and one backstage (side of the dimmer rack). Since all of the ports are wired in parallel, only 1 of them can be in use at a time, otherwise, the lights will flicker continuously.
Front Panel
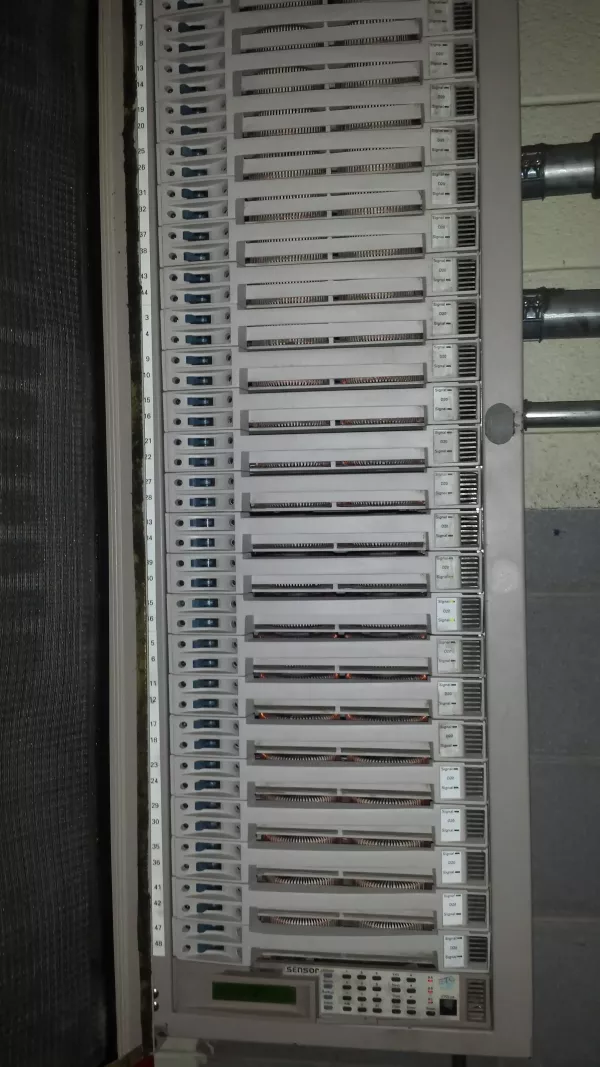
Here is a view of the front panel of the dimmer rack:
When you open the front panel, you can see the full panel. On the left side, there are the dimmer number that the slot corresponds to. These can be found on the individual slots (I'm pretty sure all the outlets for the lights are labelled, I added some missing ones). This also corresponds to the DMX channel that the port is controlled by. For example, a light plugged into plug #8 will be controlled from DMX channel 8, and is dimmed via the 4th slot.
Since all the slots are the same, I'll describe one. Going left to right, the next thing we encounter are the switches. These are disconnects that can be used to turn off one of the circuits. This might be useful if you're plugging in/swapping out a light. If the switch is in the ON position (left), then it is controlled normally. If it is in the OFF position (right), the dimmer is turned off, and there won't be any voltage on the circuit (ideally).
Next, in the center, is ventilation for the coils responsible for the voltage adjustments.
Finally, in the right, we have a signal light. This light shows the result of the DMX or signal input going in to the dimmer. If the light is turned on, then the signal light should be on. This is useful for debugging. If the signal light is off, then the dimmer rack is not receiving the signal for the light to be on. However, if the signal light is on, but the actual light isn't, then it's a problem with the dimmer or the lamp (statistically, probably either the bulb or forgetting to turn off the disconnect switch).
The switches on the bottom and the LCD are for controlling directly, see the next section on that.
Controlling Directly
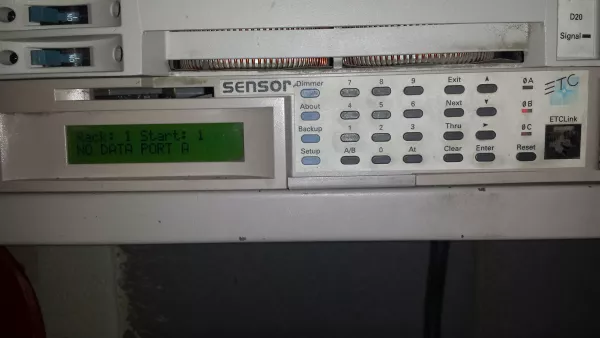
The dimmer rack and all of the lights can be controlled directly from the input section on the bottom. The LCD shows a printout of the command and status. In this photo, the rack and start mean this is rack #1 (on some big stages, you may have multiple dimmer racks), and the 2nd line indicates no lighting board is plugged in.
The 4 buttons on the left are for the modes on the LCD, and menu's are navigated using the arrows and enter button on the right. The about button is for viewing information on the system (like voltage, temperature), backup and setup are for configuration (and in general shouldn't be touched.
The “dimmer” button is the one most frequently used, to control the brightness of the lights without a lighting board. When you press dimmer, you enter the channel number you want to adjust the brightness of, then press “At”, then the brightness you want (0-100). Ranges are supported using the “Thru” option. If you make a mistake, you can clear the last input using the clear button. Press enter to confirm.
For example, you you wanted to turn on the Market Square lights at half brightness, you would use the following sequence:
Dimmer -> 37 -> Thru -> 48 -> At -> 50 -> Enter
This overwrites the DMX input, and forces those channels to 50%.
NOTE: When you are done, and you want to turn off the lights, if you were to press “At” then “0”, you would overwrite the channels to 0%, and you wouldn't be able to turn the lights back on from the lighting board. What you want to do is clear the channel, so after entering the dimmer number, press “At”, then “Clear”. This will free the dimmers so they can be controlled from the lighting board instead.
Setting channels to 0 is useful if you don't want people playing with the other lights, eg: force stage and market square to 0 when not in use so they're not randomly flickering when people are playing. Flickering lights is among our number one reason for burnt bulbs.
The “Reset” button will restart the dimmer rack. It usually takes a few seconds to reboot, but is great for clearing weird dimmer settings. It's also easy to teach to staff who want to be able to turn off the lights.
The ETCLink port can be used with an ethernet cable to connect to the Express 24/48 to get telemetry such as temperature, etc. We don't have it wired and don't use it.
Controlling from a Lighting Board
Most frequently, you will be controlling the lights from a lighting board. We use 5 pin DMX (though only 3 are wired) on the dimmer rack and lighting board. The lighting board can be used from several strategic locations: There are 4 DMX ports (I'm aware of) in the school that are wired in parallel, allowing a lighting board to be connected. 1 in the Drama Room (by the speaker amp, across the drama office), 1 in Radio L'Am (under the microphone/speaker plugs), 1 in the Market Square (the panel by the cafeteria door) and one backstage (side of the dimmer rack). Since all of the ports are wired in parallel, only 1 of them can be in use at a time, otherwise, the lights will flicker continuously.
The dimmer rack listens to channels 1-48 on the DMX-512 network. This means you could technically connect other lights as well. For our 2016-2017 school plays, I brought in some RGB LED lights, and used some of the extra DMX channels to control them. You just need to convert the 5 pin DMX to 3 pin, which can be done with a simple adapter you solder. Additionally, you can use your own DMX controller to control the school lights using the reverse version of the adapter. I used a uDMX device to control all the lights from my laptop in 2018.
Troubleshooting
Flickering issues
If you have flickering, it might be from multiple lighting boards being plugged in. Otherwise, if the lights are turning off the coming back on, this is an issue I faced for all 4 years I was at L'Am. We had technician's from Christie Lights and ETC come in to diagnose it and they said as follows: Due to the dust in the cabinet, the airflow sensor in the dimmer rack doesn't detect sufficient airflow and turns off the power. Some interesting notes of this are: the voltage input is consistent, the temperature sensor is still cool, yet the flickering occurs. For bigger shows, this is remedies somewhat by leaving the front panel open, and pointing a fan towards the dimmer rack, but this really should be addressed in the near future.
Dimmer not working
If you have issues with the dimmer, check the signal light described above, and make sure the disconnect switch is in the proper position. In the rare event one of the cards failed, then don't attempt to replace it and call a technician. 3x 120V can arc and can kill you. Don't mess with high voltage!


